![]() PHOTOGRAPHY PROTOCOL
PHOTOGRAPHY PROTOCOL
HOME • NEWSFEED • EDUCATION • RHOI PUBLICATIONS • RHOI BIBLIOGRAPHY • RHOI STRUCTURE • INFORMATICS • MAP
INTRODUCTION
Quality photography promotes effective assimilation of fossils into the scientific record and improves public visibility of museum collections. Major components of the RHOI mission are increasing the visibility and importance of affiliated projects and institutions, and sharing scientific data in a timely fashion. Image production is thus a cornerstone of the integrative mission of the RHOI.
NEVER SHOOT MORE THAN ONE SPECIMEN PER FRAME UNLESS THE PHOTO HAS A SPECIFIC PURPOSE. Images with multiple specimens cause problems for downstream database management. Unless you have a specific use for a multiple specimen image, never take one. It does not save time, it wastes it.
Two major factors affect image quality: camera and physical setup.
CAMERA AND LENS
Many consumer-grade digital cameras are adequate for the task of web-presentation at 72dpi (dots, or pixels, per inch). For publication, however, shooting with a camera capable of much higher resolutions is best. Scientific publications generally require images of at least 300dpi at their actual printing size. In other words, if the published image will be 3 inches by 4 inches, the image should be >300 dpi when scaled to these physical dimensions. It is advisable to plan images for eventual publication at a size of 8 inches by 5.5 inches, or one half standard page size. In simple terms, images should be at least 5 megapixels (5 million pixels) when they are captured. It is important to fill the image frame with the fossil subject to maximize the resolution captured from the actual specimen.
Cameras vary in settings available and not all provide adjustable irises, but, if adjustment is possible, keep the f-stop above f8 (f32 or higher is preferable). Set the shutter speed only after setting the aperture. Remember that small apertures (high f-numbers) require slower shutter speeds.
Lenses with low focal legths distort specimen dimensions. If possible, always use a lens with a focal length greater than 80mm.
Use the camera’s timer to avoid the vibration that is inevitable when manual shutter release is employed. Refer to your camera's user manual for details about manual settings.
Always store digital image files in an uncompressed format like TIFF or RAW. Never store images as JPEGs (JPG) as image quality will suffer substantially.
IMAGE ORGANIZATION AND STORAGE
Digital images should be organized and labeled WITH THE SPECIMEN NUMBER AND VIEW as soon as they are downloaded from camera to computer. For example, you might label an image UCMP_91135_RLAT, for UCMP specimen number 91135 in right lateral view. These conventions allow easy databasing and searching. Backups should be made as soon as possible. Please refer to the HERC/Middle Awash Image Naming Protocol for an example from the Middle Awash Research Project.
PHYSICAL
LAYOUT AND SETUP
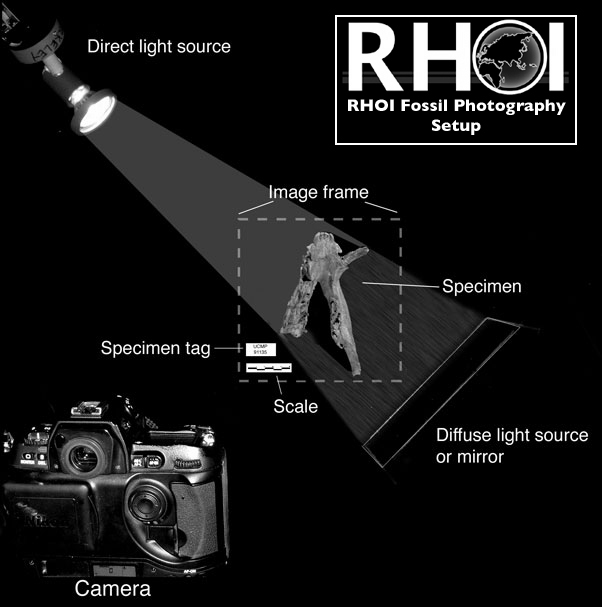
(Click to enlarge)
Proper
Lighting
Turn overhead lighting OFF and block ambient light from
windows. Turn flash OFF--under most conditions directional light is superior
to flash for highlighting anatomical detail. Lighting direction and obliquity
should be adjusted for every photograph of every specimen. Standardize
lighting to two adjustable sources: a direct source (spotlight) illuminating
from the upper left, and a diffuse source (foil, a cloth covered mirror,
or a soft incandescent light) illuminating from the lower right. The direct
light source should be positioned oblique to the specimen so that important
morphological features cast shadows. The diffuse light source should fill
in much of the shadowed area without casting any of its own shadows. Lighting
should be adjusted for every photograph of every specimen.
Stable
platform
Secure the camera to a sturdy tripod or copy stand. A ball-head
attachment for the camera allows it to be oriented relative to the specimen.
Frequent specimen reorientation is cumbersome and potentially dangerous.
Black
velvet
Black velvet is the best background material. A brush or
typewriter cleaner putty should be used to clean the background. If black
velvet is not available, a dense black rubber such as gasket neoprene
sanded with very fine sandpaper can be used for background.
Specimen
identification tags
Each image should contain a small paper tag identifying
the specimen number. This is CRUCIAL for organizational purposes.
These tags should be neatly handwritten or typed to ensure readability.
Be very careful and organized when doing this. Develop a procedure to
insure that images NEVER contain the wrong tag.
Metric
Scale
A ledgible scale is a necessary component of every image.
Alignment with the specimen is critical--keep the scale leveled in the
plane of focus (plane of maximum scientific information or midline). Place
the scale along the frame edge for easy cropping.
Props
Several small black rubber supports in various shapes should
be available to orient fossils. Larger specimens may need small sandbags
for correct positioning. Avoid plastacine or clay, which harm the fossils
and mar the background.
Reflectors
and flashlights
Mirrors and flashlights are useful for placing light in
areas not illuminated by the main light sources described above.
Views
and orientation
Multiple views greatly increase the value of image databases.
All captured views should be anatomically standardized where possible,
using the midsagittal plane for reference. Teeth should usually
be photographed in occlusal view and at least one other view. The
second view should be set up with the occlusal surface of the tooth toward
the bottom of the frame for upper teeth and toward the top of the frame
for lower teeth. These orientations should hold for any cranial
shots that present mandibles or maxillae. For other elements, use
anatomical conventions.